Tricking Out Your Tech

Tricking Out Your Tech
By Steve Froese, F276276
My wife and I are the proud owners of a Generation Z RV. Among other things, Gen Z embraces technology. In this article, I will discuss how we gave “Hopper” a leg up in this regard.
While she is a mere teenager at 17 years old, some would consider her to be “over the hill” in RV years. On the contrary, Hopper is a beautiful home on wheels that certainly does not look her age. She is mechanically and cosmetically sound, and we don’t have to worry about things like diesel exhaust fluid (DEF) or the absence of propane appliances.
However, also because of her age, some of the amenities are a little dated. She lacks centralized digital control of lights, awning, slideouts, etc. But not having this reduces the chances of system failure, so I am totally okay with that. It’s not inconvenient to operate a manual switch. In fact, it’s much simpler that way! What we do miss with Hopper is our big-screen surround sound home theater. Don’t get me wrong; my wife and I aren’t in the habit of hunkering down in the RV all day binge-watching. But after a long day of biking, hiking, or exploring, we enjoy being able to catch up on our favorite streaming shows before turning in for the night.
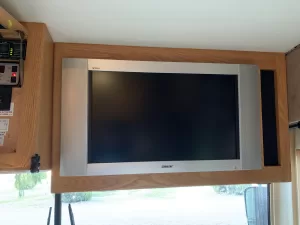
The original TV.
Our RV came equipped with a 5.1 surround-sound amplifier with a built-in DVD and VCR player, as well as a video switcher to select different sources for the front, rear, and optional outside television sets. However, the front TV is a 27″ Sony semi-flat screen. This television is not high-definition and does not support HDMI input, which is a key factor in today’s entertainment systems. Instead, the factory-installed system was connected via component cables and standard RG58 cable coax. This allowed for cable, over-the-air programming, or input from the amplifier through the component cables.
I previously added a Blu-ray player to the system, but this did not provide us with HD video. However, I was able to access full 5.1 audio by connecting an optical audio cable, which the amplifier supports.
I finally had an opportunity to upgrade the TV during some recent downtime in our local RV park. I previously measured the space available to the front TV and realized I would be able to install a 32″ TV where the 27″ is. My plan was to purchase a smart TV and connect it to the Blu-ray player with an HDMI cable. At the time, I decided I would worry about upgrading the 5.1 amplifier at a later date, since the speaker system on the new TV was allegedly quite good.
First, I needed to determine how the old TV was attached to the RV. By looking at the back of the overhead TV cabinet (between the console and the windshield), I noticed a large hole in the back of the cabinet and the TV screwed to a simple metal plate attached to steel framing. I reached into the opening and disconnected the cables to the TV. Then I was able to remove the four screws holding the TV to the bracket while my wife held the TV.
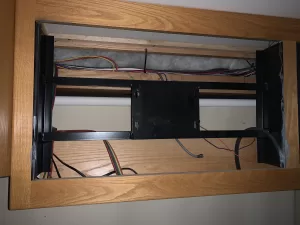
Original TV removed, now showing the mounting plate.
I next had to determine what kind of mounting to use for the new TV. The old TV used 100×100 VESA (Video Electronics Standards Association) mounting holes, whereas the new TV utilizes 200×100 spacing. The easiest thing to do would have been to use the same VESA holes and just use the same bracket holes. However, since the new TV utilizes 200mm vertical spacing, the bracket is not large enough to support this. Therefore, I decided to incorporate a TV mounting bracket. Knowing that the TV was simply mounted to a plate, I opted to purchase a simple wall-mounted bracket.
I mounted the TV portion of the bracket on the back of the TV and then prepared the wall-mount section. This was a simple matter of measuring the required clearances and dimensions and drilling new holes through the RV plate to match the bracket holes. I used bolts, washers, and nuts to secure the bracket to the wall plate. Since the new TV is much lighter than the old one, I didn’t have to worry about weight limits for the wall plate or framing.
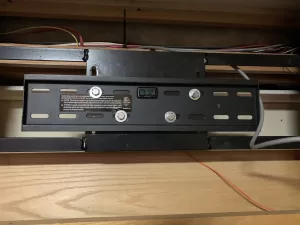
Bracket attached to the plate.
Before installing the new TV, I routed an HDMI cable from the Blu-ray player on the other side of the overhead console to the TV location. This required routing the cable behind the cabinetry. Similarly, I ran an optical cable from the 5.1 amplifier to the TV. A slightly unexpected benefit to the particular television I purchased is that it supports optical audio. This is important, since it is really the only full 5.1 audio protocol that is supported on older systems, as it predates HDMI by a significant time frame.
Next, I connected the TV to the wall-mount bracket and centered it in the cabinet cutout. From the back of the cabinet, I installed some sheet-metal screws to prevent the TV from sliding side-to-side on the bracket.
Finally, still from the back of the cabinet, I connected the cables and tested everything. The TV functions exactly as intended, including full 5.1 audio from the amplifier, thanks to the optical audio cable.
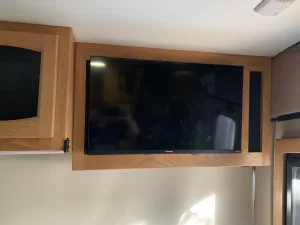
The new TV installed.
I connected the smart TV to the RV Wi-Fi system, and now we have access to all our streaming services, as well as over-the-air and cable service — all in full 5.1 and HD video! I am planning on upgrading the rear bedroom TV in the near future.
While I am a very handy DIYer with experience in AV and broadcast installs, I was expecting a challenging upgrade. However, in the end, it was much easier than I anticipated. If you are considering a similar upgrade to your RV, the most important thing is planning.
The post Tricking Out Your Tech appeared first on Family RVing Magazine.
Source: https://familyrvingmag.com/2023/03/09/tricking-out-your-tech/