DIY Offroad GPS! Cheap But Effective!

About three years ago, I got myself an expensive, name-brand, offroad GPS navigator. It was a decent system that included both on-road point-to-point navigation as well as offroad topographical mapping. It did everything I needed it to do; however, I was acutely aware that the system was based on a very cheap Android tablet that was never really designed to be used on the hot dashboard of a 4WD.
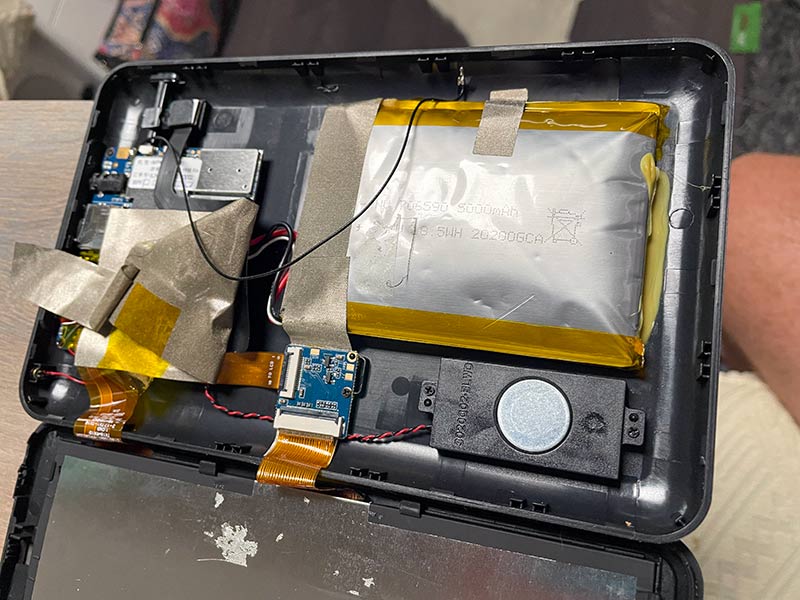
Nevertheless, I persevered with it until the inevitable happened. The battery swelled up and split the unit into two pieces. I enquired with the manufacturer as to what the cost would be to fix it. I nearly fell over when they told me it would be over $200. It was about this time I thought I could probably put together my own system for less money with all the features of the name-brand unit.
This is a description of what I did as well as a list of the resources I used so you can build one yourself…
CHOOSING A BASE SYSTEM
The first item to purchase is a suitable Android notepad with a screen size of around 7in. A search on the internet will present several options, many of which are not much better quality than the system I replaced. Eventually, I found a Lenovo 7in Android tablet that appeared to have the specifications I needed and, being a recognised brand name, the quality promised to be reasonably good. Priced at $99 on special at Big W, I assessed this as good value for money.
I wasn’t wrong. The construction of this notepad is far superior to the previous unit and its metal case would aid heat dissipation. The Lenovo was also thinner and lighter.
The performance of the Lenovo is acceptable. It wouldn’t threaten a Samsung Galaxy in the speed stakes but it proved to be more than enough for what I needed.
At the time of writing this article, the Lenovo 7in notepad had just been discontinued. You might be lucky to find some remaining stock around but you’ll likely need to choose another unit. Fortunately, there are many in the sub-$150 price range.
OFFROAD GPS NAVIGATION
When it comes to choosing navigation applications, Android has many options. I chose OziExplorer. This is an Australian-designed product that has been around in various forms since the days of Windows CE. It is extremely easy to use and set-up.
OziExplorer has a selection of screen modes and it will automatically select the most detailed map for your location. Best of all it costs just $45 to purchase a licence that you can use on any Android devices you own now or in the future, and that includes 1:250,000 topographical maps of Australia. If you already have map files, it costs just $32. You can download OziExplorer and trial it free of charge with limitations.
OziExplorer uses map files in .OZF format. These are readily available from a variety of sources. More about the maps later.
ON-ROAD NAVIGATION
Again, thanks to the extensive Android application library, there are plenty of on-road navigation applications to choose from. The problem with the vast majority of these is they cost a lot of money to purchase, especially if they have the option to download offline maps that can be accessed without an internet connection, which is what you want for this type of system.

These paid apps are excellent and you may well decide that they are worth the money, but I’m trying to be a cheapskate here and keep the costs as low as possible. For this reason, I chose HERE WeGo navigation for my system.
HERE WeGo is completely free to download and use. It features both online and offline maps as well as an extensive point-of-interest (POI) database. You can search for shops, caravan parks and other places in both online and offline modes without knowing the exact address.
It’s not the most sophisticated navigation system but it does the job. It does have a couple of nice features. It tells you the speed limit of the road you’re driving along and will give you an audible warning if you exceed it. It will also show you the nearest parking areas to your destination when you arrive.
OFFROAD MAPS
The most important aspect of this system is to have good offroad maps and here is where things get interesting. In the past, I have always used maps from Geoscience Australia. This federal government department produces electronic maps that are compatible with a variety of programs, including OziExplorer.
You can download its 1:250,000 scale maps for free. This scale offers a reasonable amount of detail for outback touring but if you want to do any proper offroad navigation, you will need more detailed maps.
After some searching, I came across GetLost maps. It offers topographic maps for all states and territories in 1:250,000, 1:75,000 and 1:25,000 scales. All GetLost maps are free to download and use.
I was genuinely surprised at just how good these maps were. If you combine GetLost maps with the GeoScience maps, you end up with a very good, scalable topographical view of anywhere in the country you want to travel.
STORAGE FOR MAPS
Map files are quite large and, depending on how many state and territory maps you want to keep with you at all times, the larger the memory storage you will need on your notepad. The Lenovo came standard with 32Gb of internal storage, which I estimated wouldn’t be quite enough for my needs.
Fortunately, the prices for memory cards have come down significantly over the years. I was able to purchase a 64Gb SD memory card for the Lenovo for just $15. This offered sufficient storage for my needs with plenty of room to spare.
DOWNLOADING MAPS AND SETTING UP
Downloading the offline maps for HERE WeGo was very straightforward as it is handled in the setup of the app itself. You just select what maps you want and where to download them, and the app does the rest. In use, select ‘Offline Maps’ on the home screen once you start the app.

Doing the same thing for OziExplorer is a little more complex. You can put the memory card into your notepad and download the maps directly to it, but I found that to be a bit awkward and time-consuming. Instead, I put the memory card into my laptop and downloaded the maps that way.
Both OziExplorer and GetLost Maps have instructions on how to set-up the memory card. In a nutshell, you need to create a folder called ‘Maps’ on the memory card and ensure you download your maps to this folder. You can create multiple sub-folders for each state if you like. It does help with managing the files and ensuring you have what you need. Once you have done this, you can transfer the memory card back to your notepad.
Remember, if you’re downloading high-resolution maps for large states such as Queensland and Western Australia, the download will be huge and take a long time to complete, depending on the speed of your internet connection. You can shorten the process by only downloading the maps you’re likely to need. For example, you may not be going to Western Australia anytime soon so you can leave them until you need them.
OziExplorer now needs to be configured to find your new maps. It will be looking for them on the notepad’s base memory. This needs to be changed to the Maps folder on the memory card. Open the main menu, go to ‘Configuration’ and then to ‘General Settings’. You’ll see Map Paths 1 and 2. As long as one of these is changed to the SD card, OziExplorer will look for the map files there. If you have any issues, OziExplorer offers excellent support via email.
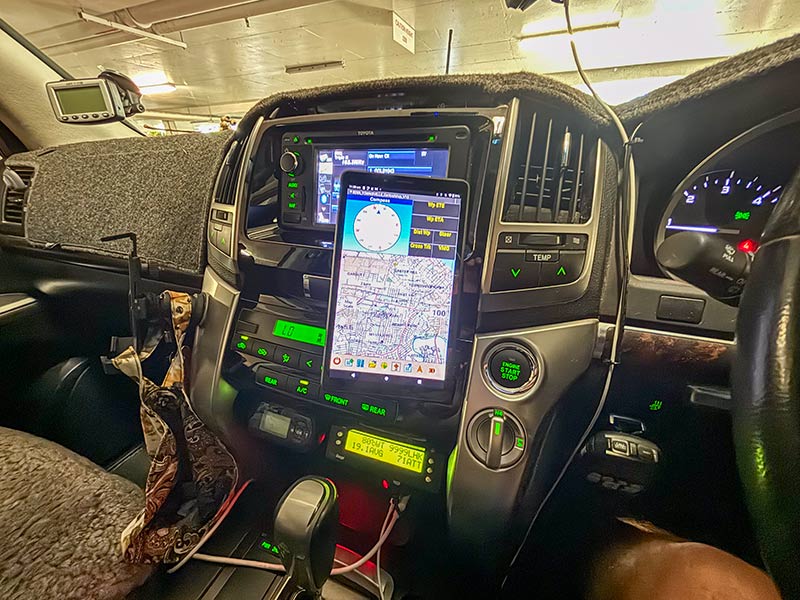
MOUNT FOR YOUR GPS
The final step in the process is to choose a car mount for your notepad. Going back to my original navigator, it came with a windscreen mount that meant the unit was operating in the hottest part of the car. Not the ideal environment for a cheap notepad. I wanted something that would attach to the dashboard so that the unit was out of direct sunlight.
This would prove to be quite a challenge as I had little available space on the dashboard of my 200 Series Land Cruiser. I tried a few different mounts but none proved satisfactory.
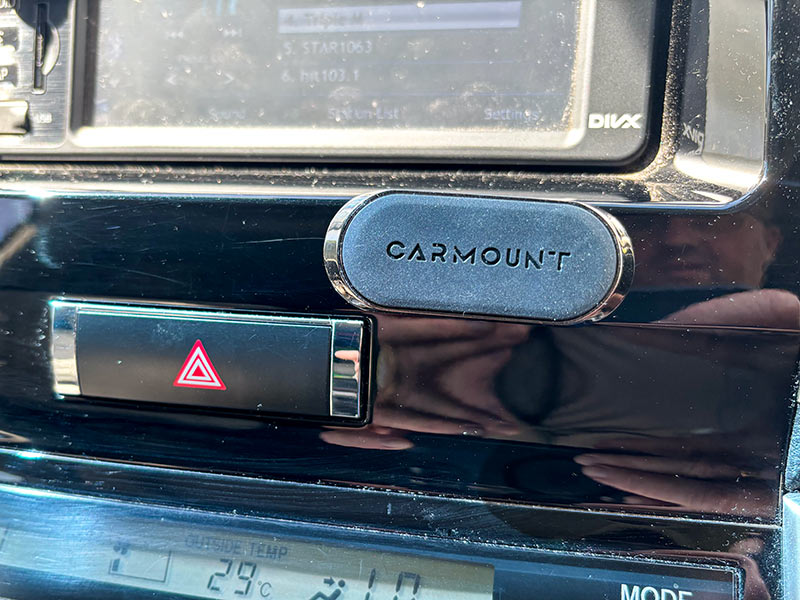
Then I came across the CarMount magnetic system. This mount uses powerful magnets to attach the device to the base, which is held in place with excellent double-sided tape. The base itself is tiny compared to many others. So far it has proved to be up to the task.
At the time of writing this article, CarMount was available from the manufacturer for $35. It pays to do a Google shopping search as I found the same kit from MyDeal for half the retail price.
The CarMount may not be suitable for every application so I encourage you to look around to find something that works for you and your vehicle.
TALLY THE COSTS
Now let’s have a look at the all-up costs for this system:
| Lenovo 7in Notepad | $100 |
| 32Gb SD memory card | $15 |
| HERE WeGo Maps | Free |
| OziExplorer | $45 |
| Geoscience Topographic maps | Included with OziExplorer |
| Offline HERE WeGo maps | Free |
| CarMount | $18 |
| Total | $178 |
I imagine at this point there will be a few readers thinking I didn’t save a lot of money over the repair costs for my old navigator and, while that may be true to some extent, consider that I now own all the software, maps and supplementary hardware for the notepad. If it should suffer the same fate as my original system, I just have to buy a new notepad. Everything else is transferable.
I could have reduced the cost even further if I wanted to. Instead of purchasing a new notepad, I could have used an old Android phone that I had lying around. I could also have avoided needing the memory card and just downloaded maps for one state at a time and relied on the unit’s internal memory.
I could have continued to use the trial version of OziExplorer although the limitation would have impacted the usefulness of the system. These would have reduced the all-up cost to just the cost of a CarMount!
SUMMING UP
At the end of the day, I was able to build a full-function GPS navigator that is capable of doing both on-road and offroad mapping for less than it would have cost me to repair my original unit. Functionality is as good or even better than the original system.
OziExplorer’s offroad mapping is far superior, in my opinion. It has so much more functionality and customisation than my previous system, making it a pleasure to use. On-road, point-to-point functionality of HERE WeGo is satisfactory. I would prefer to use Google Maps on my mobile phone when I have mobile coverage but when that’s not available, the HERE WeGo app is very usable.
I will acknowledge there are plenty of purpose-built in-car GPS units available and some do include offroad mapping as well, but the prices for these can exceed $1000. Not everyone, including me, can afford that.
While it did take some effort to put my cheap GPS solution together, the result is very good and budget-friendly. Plus, it is enormously satisfying to see how well it works after going through the effort myself.
If you need a decent GPS, and you can’t afford the name brands, give this a go. You have nothing to lose. Well… nearly nothing.
The post DIY Offroad GPS! Cheap But Effective! appeared first on GoRV.
Source: https://www.gorv.com.au/diy-offroad-gps-cheap-but-effective/