Yes, You Can Fix Common RV Plumbing Problems Yourself!
Running water in your rig is essential for so many creature comforts. But when (not if) your RV plumbing has problems, you can kiss those comforts goodbye.
Thankfully, some of the most common water line, faucet, and toilet problems are relatively easy to fix. Let’s go over ways you can take a DIY approach to those issues, so you can get back to camping in comfort.
Five Common RV Plumbing Problems You Can Easily Fix or Troubleshoot Yourself
RVs have some of the most basic plumbing around. Similar to a stick house but not as complex, most problems are easily repaired by anyone with a do-it-yourself mentality and willingness to learn. Let’s take a look at the five most common problems you’re likely to encounter as an RVer.
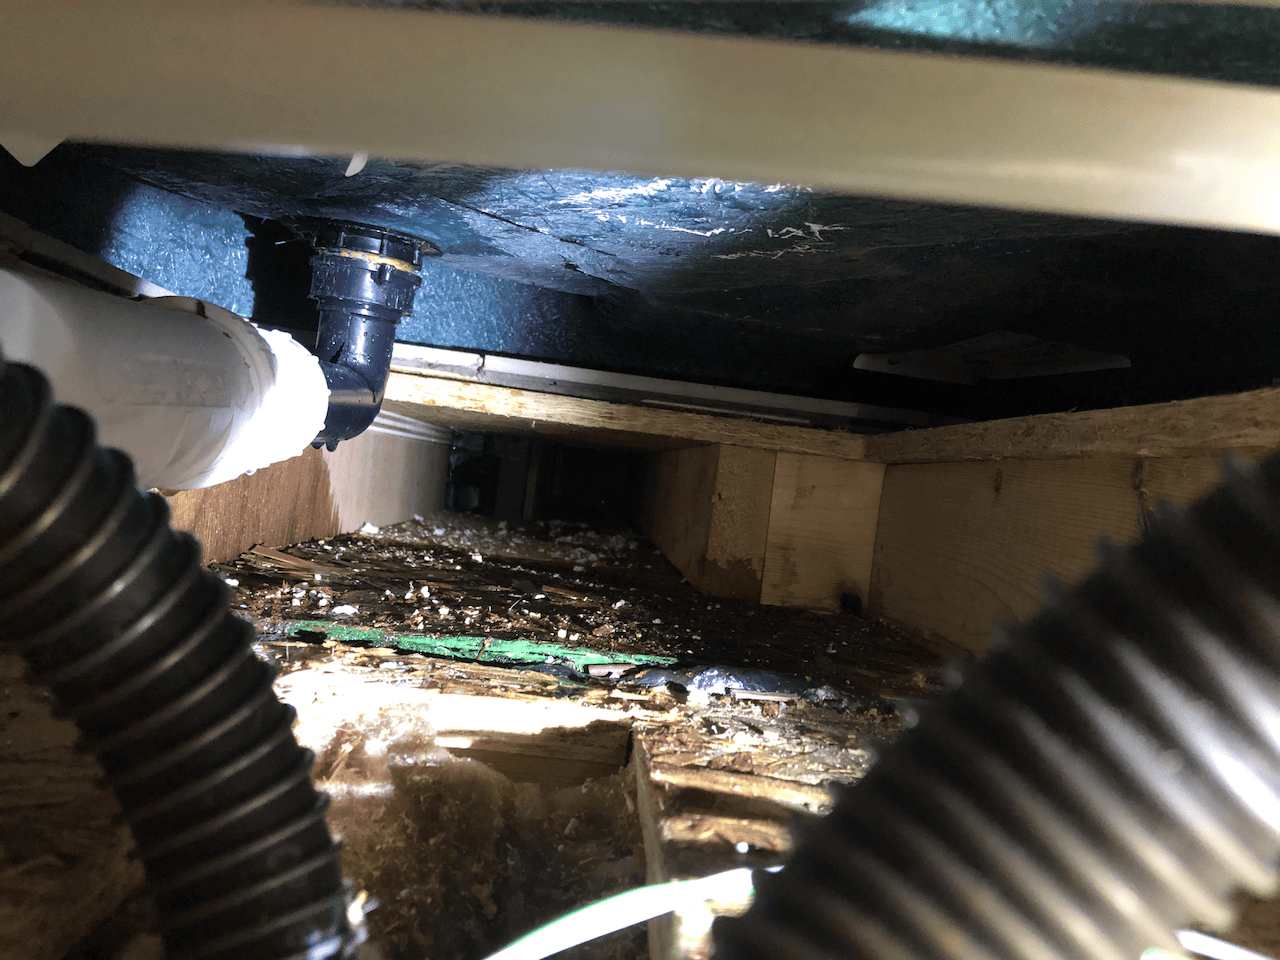
1. Leaky water lines
Your RV’s water lines are part of your RV plumbing that runs throughout the unit to transport fresh water and wastewater. Freshwater lines are typically made from PEX plastic tubing, while wastewater lines typically use ABS plastic pipe.
Usually, the water lines are hidden underneath the floor of your RV. This makes the RV more aesthetically pleasing, but it can also make repairs a bit harder. You may have trouble accessing the water lines and will likely have to work in a cramped space to fix them.
The most common RV plumbing issue with your water lines will be leaks.
Left untreated, a water leak can cause severe structural damage to your RV. So if you notice signs of a leak, such as wet spots, mold growth, and unpleasant odors, it’s essential to take swift action to fix the issue.
Pro tip: You will know you have a freshwater leak by turning off your city water and turning on your water pump. If the pump frequently turns on, odds are you have a leak.
To fix a leak, you’ll need a tubing cutter, replacement tubing for the section of the water line, and a fitting such as a SharkBite fitting. Most RVs use 3/8″ or 1/2″ tubing for water lines.
First, identify the location of the leak, then shut off your water system. Open your low spot drains to empty out the lines so you avoid getting wet when working.
Next, use the tubing cutter to remove the damaged tubing or fitting (note: if the fitting is bad you shouldn’t have to cut the tubing). Then attach the new section of tubing using your chosen fitting.
2. Water pump problems
Water pumps provide pressurized water to your RV plumbing system, and they can present a number of problems.
If your water pump seems to run, but no water comes out, it can indicate a few different issues, such as the following:
- An empty freshwater tank: It may seem silly, but it’s surprisingly easy to forget to check your water levels. If your tank gauge indicates it’s empty or low, then filling your tank may fix your pump issue.
- Loose connections or damaged lines: If your freshwater tank is full, check all the connections to the water pump. If you find loose fittings or damaged water lines, this is likely the source of the issue. Replace the damaged sections (see the previous section for instructions) and it should fix the issue. Alternatively, lines may be blocked; removing the blockage should fix the issue.
- A broken water pump: If none of these are the issue, you may need to fix or replace your water pump. Disconnect the water line from the pressure side of the pump, and have a friend toggle the pump on and off. If water only trickles out, then your pump is broken. If it comes out pressurized, you likely have a damaged water line somewhere between the pump and the faucet, and you’ll need to find and replace it. Or, it could be a clogged filter on the pick up side of the pump.
If your water pump is cycling on and off even when you aren’t running any faucets, this likely indicates a leak in your water lines.
3. Toilet problems
If your RV has a flush toilet, it can be a source of many RV plumbing problems.
The most common toilet problem is a clog. Fixing this can be as simple as using a plunger. For more serious clogs, you’ll need to deal with your black water tank:
- Close the valve to the black water tank.
- Add water, then some holding tank cleaner to the tank.
- Let the cleaner sit for at least 12 hours (or up to 72 hours) – the longer the better.
- Finally, open the valve to empty the tank, then close the valve rinse it out and reopen the valve.
Another common toilet problem is leaking, either from the base or the hose connection.
If water is leaking from the base, you likely need to replace the flange seal, a ring of rubber on the underside of the toilet. To do so:
- Shut off the water to the toilet.
- Flush the toilet to drain it out.
- Take the toilet off the floor (here is how you replace an RV toilet). Keep in mind that In most all cases, you will need to disconnect the water line in order to move the toilet enough to gain access to the flange.
- Remove the old flange seal and install the new one.
- Replace the toilet and turn on the water.
If water is leaking from the hose connection, do the following:
- Turn off the water supply.
- Test the hose for leaks by running water through it.
- Remove the hose assembly if you notice a leak. If so, you can fix it with some Eternabond tape as a temporary fix. In more serious cases, you’ll need to buy a new hose assembly.
Finally, your toilet valve that keeps water in the bowl may get stuck open. If that happens, its very likely that gunk is the problem. Try removing the gunk with a gloved hand and gently cleaning around the gasket with a brush. Then you can apply a silicone lubricant around the valve to keep it moving smoothly.
If that doesn’t solve the problem, you’ll need to shut off the water supply, remove the faulty valve, and replace it with a new one.
4. Leaky faucets
Another common RV plumbing issue is a leaky faucet. In many cases, this is caused by a buildup of minerals in the faucet, or it’s due to a lousy washer or seal. Unfortunately, most plastics OEM RV water faucets are not repairable, nor do the parts exist to fix them. Don’t bother trying to fix this problem. It’s cheaper and faster to just buy a new RV water faucet and replace it yourself.
5. City water connection issues
When you connect to a city water connection, you may experience water pressure that is too high, or too low.
Pressure that’s too high can damage your RV plumbing. If your campsite’s water pressure is too high (typically higher than 60 psi is too much), you’ll need to lower the pressure. Thankfully, this is a reasonably easy fix. Simply purchase a water pressure regulator and install it to ensure the water pressure always stays at a safe level.
Pro tip: Install it between the campground faucet and your non-toxic RV water hose and protect your hose too.
Low pressure isn’t a threat to your RV plumbing, but it can be a major annoyance. If your pressure is low, ensure you have the spigot all the way open, and that there are no kinks in the hose. If neither of these fixes it, the issue is likely on the campground’s end. Try turning on your water pump and supplement the city water connection pressure via water from your RV pump / water tank.
Worst case scenario, you can always fix it except find a better campsite.
Track your RV maintenance
While nobody wants a leak in their RV, the good news is that with a bit of know-how, it’s usually an easy fix. By following the steps in our handy guide, you’ll be able to fix the most common RV plumbing issues. With just a few tools, you’ll be able to take on any issues that come your way.
Make sure you keep track of all your RV maintenance and repairs with an online tool such as RV LIFE Maintenance. Not only can you keep all of your documents in one place, but you’ll also receive timely reminders when maintenance is due to help you avoid costly repairs and potentially serious accidents.
The post Yes, You Can Fix Common RV Plumbing Problems Yourself! appeared first on RV LIFE.
Source: https://rvlife.com/rv-plumbing-problems/