Organized Crafting On The Go
Third in a series of articles about stitching and other creative arts during RV travel.
By Diane L. Murtha, F465708
In the first article in this series, I discussed packing your crafts and sewing supplies as you would when preparing for a quilting retreat. But honestly, we tend to overpack for retreats — throwing in more “just in case.” RV space is a premium commodity, so let’s talk more about packing and stashing. Preparing, packing, and storing my supplies in the RV involves an ongoing series of lessons, and I regularly make changes as I pick up tips and better ideas from fellow RV crafters.

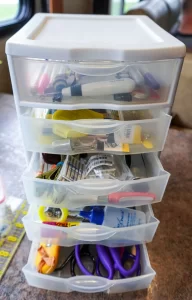
Diane uses a miniature five-drawer plastic organizer to hold sewing essentials.
Prepare
I became a snowbird during the winter of 2020. I was excited to trade Iowa’s snow and icy temperatures for Florida sunshine, but I was apprehensive about how to pack all my quilting and crafting supplies. I semi-planned nine projects for three months away — a combination of new and unfinished work. Although I had nine projects packed in my sewing room closet, an unexpected snowstorm prompted an early departure, and I was frantically grabbing bags to load into the RV. In my rush to get ahead of the storm, I arrived in Florida with only five projects! Luckily, a fellow snowbird and neighbor waited out the storm and was a week behind us, so she graciously transported another bag of projects for me. First lesson learned: Label all projects and packed bags with wording such as “Take to Florida,” so you, or a friend, can readily recognize them when it’s time to load up.
Semi-planning didn’t work for me. I only packed neutral-color threads and didn’t think about colored threads for quilting. I also didn’t plan appropriate backing, enough batting, and other supplies. Luckily, again, there is not a shortage of quilt stores in Florida! Second lesson learned: Completely pack everything you need for a project.
I did better during the winter of 2020-2021; I developed a spreadsheet form that listed everything needed by project, and I checked it off once packed. I also pinned labels to items, such as “backing fabric for Project A” or “Project B binding.” Third lesson learned: Have your sewing machine serviced by your local technician before a long RV trip to assure your machine is in good working condition. Don’t ask why!
Pack
Containers that lock, latch, snap, seal, shut, stack, or zip are desirable for storing everything in your mobile studio — from threads, knitting needles and yarn to fabric and paints. Clear project boxes or large plastic zippered bags (like those new blankets come in) can corral skeins of yarn or fabric.
A box with a flip-cover lid, or any clear plastic tote, can hold multiple items and smaller containers and is excellent for paints, pencils, and beads. My favorite container is a miniature five-drawer plastic organizer that holds my scissors, tape measure, needles, marking pencils, pins, and other sewing basics. It snuggles safely between the printer and the bunk inner wall while traveling, so I can easily reach it when I’m ready to sew.

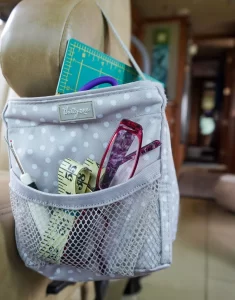
A small tote bag on the arm of the RV’s passenger seat keeps reading glasses and small items handy.
Store
Now that we’ve prepared and packed our supplies, where do we store them? It’s fortunate that the RV industry is famously known for utilizing every possible space for potential storage, so take advantage of it. But remember, we share the limited RV real estate with our significant others.
RV types and floor plans provide different storage options. A Type A motorhome offers more “basement” storage space than a Type C motorhome, a fifth-wheel, or a travel trailer. My brilliant husband insisted on a bunk unit, and I couldn’t be happier. Kids slept in the bunks only twice, and the upper bunk is primarily craft project storage the rest of the time. Sewing machine oil, adhesive spray, and starch ride safely in the “wine cellar” so they can stay upright to prevent leaking.
Bags of batting or yarn and project boxes can go into the coach “basement.” They can be squeezed in between lawn chairs or golf clubs and accessed as needed. These large, bulky items also can be ordered online and shipped to your destination or to a nearby postal or UPS facility.
Other common storage locations in an RV are under the bunk bed, under the main bed, in the shower stall, under the dinette bench seats, behind the table and chairs, and inside the washer and dryer. Open your sofa bed and store quilt tops, finished quilts, or folded batting on the mattress before folding up the couch. I love keeping a small tote bag on the armrest of my passenger seat to capture my reading glasses and small craft tools, both while riding and watching TV.
You’ll enjoy your crafting and sewing hobbies more on your RV journeys if you take time to prepare the projects, pack them in RV-friendly containers, and find reasonably accessible storage space. Keep in mind you still may forget something, but don’t fret: it’s an opportunity to shop locally or order online.
Stay safe, and happy quilting and crafting!
Diane L. Murtha is a quilter, fiber artist, lecturer, and instructor. Quilting for over 30 years, she gravitated to art quilts 10 years ago and discovered she loves challenges. Her quilts are included in books, magazines, juried exhibits, and international shows. Learn more at www.dianeLmurtha.com, follow her on Instagram @dianelmurtha, or email [email protected] for more information.
The post Organized Crafting On The Go appeared first on Family RVing Magazine.
Source: https://familyrvingmag.com/2022/10/07/organized-crafting-on-the-go/


