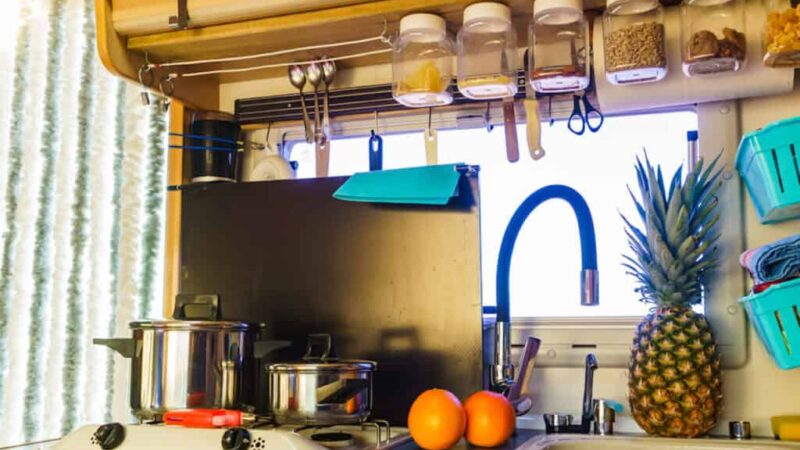
8 RV Kitchen Projects for Less Than $50

One more thing we adore about RVing? Having a kitchen with us wherever we go. That said, we tend to invest in older units rather than buying brand new, meaning RV galley projects are usually pretty badly needed by the time we get our hands on a rig.
The good news? We’ve found plenty of inexpensive ways to spruce up our RV kitchens. Here are 8 RV kitchen projects for under $50.
Put Up a Backsplash
One of the first things I like to do when updating an RV is add a backsplash behind the stove and sink. This is a great way to add a splash of color to the room or even just break up the monotony of the neutral wallpaper. It’s also super easy and inexpensive when you use peel-and-stick tiles. There are tons of stick-on tile options out there, and they are super lightweight and look great!
Replace the Faucet
If your sink faucet A) looks old and outdated, B) doesn’t have the features you’d like, or even if C) it’s just too short for your tastes, you can always replace it. Believe it or not, you can buy and install any household kitchen sink faucet you like, as long as it matches the faucet holes in your sink. Installing a faucet is surprisingly quick and easy, and a shiny new faucet can make your kitchen look much sharper and more modern.
Upgrade the Countertop
Changing out the countertop will completely change the look of your kitchen, making it an excellent upgrade. Unfortunately, most replacement countertop options are expensive and too heavy for use in an RV. The exception? A plywood countertop. Obviously, the total cost will depend on the type of materials you choose and how big your countertop is, but it can be under $50 if you play your cards right.
The video below is a good example of a plywood countertop in an RV.
Change Out the Hardware
For another super easy upgrade, consider changing out the hardware in your kitchen. Switching out knobs, drawer pulls, and hinges is easy enough that anyone can do it, and it is possible to find snappy-looking hardware without spending a fortune.
Note: If you’re looking to find super inexpensive supplies, consider visiting your local Habitat for Humanity ReStore.
Add a Coat of Paint
Paint is an inexpensive way to brighten any space. This is especially true if you can find discounted paint at one of the aforementioned Habitat for Humanity stores or a local hardware store.
The thing is, painting an RV can be challenging thanks to the permanent wallpaper and those slick cabinet and drawer fronts. Still, it is 100% possible to do, and the finished product certainly is nice to look at.
To paint your RV kitchen:
- Remove all light and outlet covers, cabinet doors, drawers, etc.
- Repair holes with wood filler.
- Scrub the walls with TSP.
- Remove any caulk that can’t be painted, and replace with paintable caulk.
- Sand everything you plan to paint.
- Tape off edges and corners with painter’s tape.
- Paint everything you wish to cover with a coat of primer.
- Paint a first coat.
- Allow to dry.
- Paint a second coat.
- Allow to dry.
- If needed, paint a third coat.
- Allow to dry.
- Remove tape.
- Replace light and outlet covers, cabinets, drawers, etc.
Lay Down a Rug
Much simpler than painting the whole kitchen, a simple area rug can make an otherwise dull kitchen look brighter and more inviting. We recently got a colorful rag rug that I absolutely adore, but you can put down any rug you like to make your cooking space your own.
Create a Magnetic Chalkboard Fridge
One thing I find annoying in an RV kitchen? The fact that the fridge is not magnetic. Instead, we find ourselves hanging things on the front of the oven, something that causes issues when we need to open the oven door. I have had an idea to remedy this problem for a while now: a magnetic chalkboard fridge.
To make your fridge door magnetic and chalk-friendly, simply grab a container of magnetic paint and a container of chalkboard paint. Add a couple of coats of magnetic paint to the front of your refrigerator and then top them off with a coat of chalkboard paint. This paint does a really good job of clinging to slick surfaces, so you shouldn’t have to sand or prime for this project.
Hang a Magnet Strip
Last but not least, if you’re looking to add some extra functionality to your RV kitchen, consider hanging a magnetic strip or two on the wall or inside a cabinet.
A magnetic knife strip is ideal for those who like to keep their tools handy. That said, it’s probably best to hang this one inside a cabinet so the knives don’t go flying while you’re moving down the road.
You can also use a magnet strip as a spice rack. This could hang right by the stovetop, making it easy to grab the spices you need quickly.
As you can see, there are plenty of inexpensive ways to make your RV kitchen look and feel like your own. Why not pick a couple of these ideas and get to work making your rig feel even more comfortable?
The post 8 RV Kitchen Projects for Less Than $50 appeared first on RV LIFE.
Source: https://rvlife.com/rv-kitchen-projects/