Neko Rig: A Complete Guide on Rigging, Setups, and How to Fish It
In the world of bass fishing, you can try hundreds of techniques and thousands of baits. This can make it challenging to find your tried and true favorites, but it seems that most bass anglers I know have two or three techniques and baits that they lean on when the bite gets tough. For me, a Neko rig with a soft plastic stick bait is one of those mainstays.
I openly admit that I’m not very patient, which might not make me the best angler in the world. Power fishing is where I thrive due to the constant action and movement that keeps me focused. But we all know that turning to finesse tactics is a must when the conditions aren’t right.
For my fishing style, a Neko rig is my favorite option when I need to slow down and try to trick finicky bass into biting. Sure, a drop shot, wacky rig, or Ned rig can get the job done, but those techniques require a lot of patience and subtle rod movements. A Neko rig, however, is the perfect power fisherman’s finesse tactic. You can fish it aggressively while maintaining a finesse presentation’s look and feel.
The Neko Rig
At first glance, a Neko rig might look a lot like a weightless wacky rig, but the secret to this rig is the nail weight. Rather than a subtle shimmy as it falls through the water, the weight causes a Neko rig to nose dive toward the bottom. You can hop it along the bottom, drag it, or simply let it sit on a slack line.
Since I like to use it as a finesse power fishing option, I’m a fan of aggressive hops near cover like dock pilings, laydowns, or boulder fields. As the weighted end of the rig skips across the bottom, the non-weighted end floats and wiggles just above the bottom, simulating a dying baitfish or fleeing crayfish. And that action drives the bass nuts.
The versatility of the Neko rig is why it has gained so much popularity in recent years. You can opt for a light nail weight like a 1/32 ounce option for a slower fall rate and more finesse presentation, or you can jack up the weight to a 1/4 ounce and really maintain bottom contact as you fish through your favorite spot. That versatility, paired with its ability to catch fish almost anywhere in the country, makes it a must-have technique to have in your repertoire.
How to Rig a Neko Rig
A Neko rig should take no more than one minute to be ready to fish. The longest part of the process is attaching the O-ring to your stick bait of choice. Here is a step-by-step guide on how to rig a Neko rig.
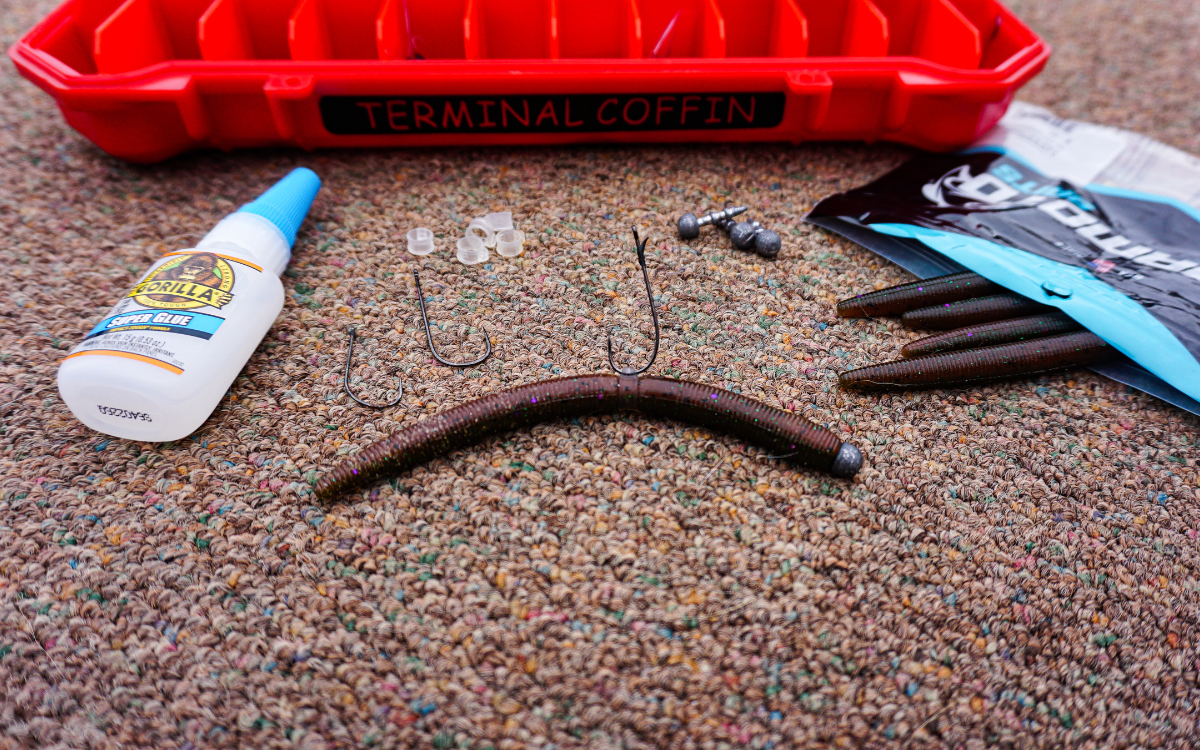
Step 1: Select your hook. The best option is a straight shank hook in a 1/0 size. Some offerings include weed guards, which can be helpful when fishing around heavy cover.
Step 2: Take your stick bait of choice and slide it into an O-ring tool. With this tool, you’ll simply slide the O-ring down the shaft and place it in the middle of your stick bait. VMC offers specialized Neko rig O-rings that help keep your hook in place, too. They’re very helpful and similar in cost to a normal O-ring.
Step 3: Select your nail weight. Simply stick the nail weight fully into one end of your stick bait. A helpful tip is to put super glue on the nail weight before inserting it into the bait. The glue ensures the weight doesn’t slide out during a long cast or while you’re fighting a fish.
Step 4: Thread your hook between the O-ring and stick bait. Make sure the hook is running parallel to the stick bait and the point is facing the non-weighted end of the rig. The bass will typically bite the non-weighed end, leaving your hook point perfectly placed to get pinned to the roof of their mouth during the hookset.
Step 5: Using a Palomar knot, tie your line to the hook.
What Makes the Neko Rig so Effective?
As I mentioned before, the versatility of the Neko rig is what makes it one of the most effective finesse presentations out there. Depending on the size of your nail weight, you can fish it shallow, deep, and anywhere in between. I typically think of it in terms of how effective a wacky rig is on shallow bass during the spawn and simply take that thought process and apply it to deeper bass in the post-spawn. In essence, it’s a deep water wacky rig with slight variations.
The most important variation is the hook placement. Rather than the hook being perpendicular to the stick bait like a wacky rig, the parallel hook presentation leads to much better hook sets and fewer lost fish during the fight. By simply acknowledging how bass tend to inhale a Neko rig, we can give ourselves a better chance of landing them with the parallel hook.
Another, more obvious variation is, of course, the nail weight. While you can purchase weighted wacky hooks, the action between a weighted wacky rig and a Neko rig is quite different. A weighted wacky rig still shimmies evenly as it descends in the water column, but the Neko rig always nose dives towards the bottom, giving the bass a different look, and in my opinion, a more natural look.
Baitfish and other prey nose down on the bottom and dig for their food. The Neko rig replicates this motion incredibly well. Whether they think the stick bait is a baitfish or crayfish I’m not sure, but in the end, as long as it gets bites for me, it doesn’t matter all that much.
In the post-spawn, as bass leave the shallows in search of their summer haunts, they tend to hone in on prey close to the bottom. Simply put, it’s easier for them to ambush and eat that prey as opposed to chasing schools of baitfish out in the open water. While being tired and rundown after the spawn, they’re always up for an easy meal. The Neko rig is the perfect technique to take advantage of that feeding pattern.
For a deep dive video on the Neko rig, check out this great video from TacticalBassin.
When to Throw a Neko Rig
Most bass fishing techniques have one similar trait: you can throw them pretty much year-round and get bites. A Neko rig is no different, but there is definitely a prime time of year to focus your efforts on to maximize bites — the post-spawn.
With the bass feeling worn out after the spawn, they’re looking for easy meals lurking along the bottom near their favorite ambush locations. Whether it’s a stump, laydown, dock piling, or a rock hump out off the bank, these locations are typically loaded with bass ripe for the picking in the early post-spawn.
The reason behind the bass favoring these types of cover is mainly due to the ability to ambush prey, but they also feel safe when tucking themselves away behind or in dense cover. As I mentioned, most bass will be pretty tired after a month of making beds, spawning, and then fry guarding. fter all of that hard work, finding a spot to just kick back and relax while waiting for an easy meal is just what the bass doctor ordered.
Your Neko rig falling near or hopping into that ambush zone signifies the easy meal that will pull the bass a few feet away from their hideout and trick them into biting. Since you’ll typically be getting bites near cover, the gear you choose to fish your Neko rig with plays an important role in the technique as a whole.
The Gear You Need to Rig and Fish a Neko Rig
Picking the Right Rod
Finesse tactics like the Neko rig often require a finesse rod to cast the light baits. I look for a fairly long spinning rod to make long, accurate casts, but I also want the rod to have a solid backbone to keep the bass from swimming back into the cover after my hookset. My favorite rod for this does not break the bank either. The Bass Pro Shops Johnny Morris CarbonLite at 7 foot 2 inch in a medium power and fast action provides me with enough sensitivity to feel the bite and a stiff enough power to horse a stubborn bass away from a laydown or dock piling. I also like the action in this rod as it loads nicely when I reel set with the Neko rig as opposed to a sweeping hookset I might use with other techniques.
Picking the Right Reel
Since the rod you use needs to be sensitive, but also have some power to move bass away from cover, the reel you choose needs to be up for a similar task. Namely, you’ll need a good, quality drag that gives you the ability to tighten at the initial part of the fight, but loosen quickly once you’re able to get the bass into open water. My reel of choice is the Daiwa BG 2500 spinning reel. With 13.2 pounds of drag available and a large handle, this reel allows you to adjust the drag quickly and get right back to fighting the fish without skipping a beat.
Neko Rig Baits
In my experience, the saltier the stick bait, the longer a bass will hold on after a bite. With that in mind, I’ve almost exclusively used a Yamamoto Baits Senko. The high salt content in their soft plastic stick bait just seems to add more action and increases the fall rate when compared to some other stick baits. If you’re looking for another option to add to your stick bait arsenal, I’ve also had some great luck with a Berkley PowerBait MaxScent The General Worm. While the salt content might not be quite as high, the addition of the MaxScent can sometimes be the ticket, especially when fishing more heavily pressured bodies of water.
As far as the size of your stick bait goes, picking between a 4- or 5-inch bait is all you really need. I personally prefer the 5-inch options as they tend to offer more action, but will go with a 4-inch bait if I’m fishing a smaller pond or lake that offers smaller baitfish. Always try to match the size of your bait to the typical baitfish in the body of water. It’s also important to keep in mind that you can fish a Neko rig with other soft plastic worms aside from a traditional stick bait, I just generally stick to the stick bait because I’ve been successful with it.
Neko Rig Terminal Tackle
The terminal tackle you use with your Neko rig is just as important as the rod, reel, and bait you choose. Selecting a cheap hook, or using one that isn’t made for this technique, can lead to lost fish and frustration on the water. The same can be said for your O-rings and weights. Below are my favorite options for terminal tackle when it comes to fishing a Neko rig.
The Best Neko Rig Nail Weights: VMC Neko Weight (1/16 to 1/4 ounce)
The Best Neko Rig Hook: VMC Neko Wacky Hook (1/O)
The Best O-Rings: VMC Crossover Ring
The Best O-Ring Tool: VMC Crossover Pliers
Line
The last piece of gear you’ll need is the line on your reel. Avid bass anglers often fish spinning reels with a braid-to-fluorocarbon leader. For my braided line, I like to go with 10-pound Daiwa J-Braid, but most braided lines will do the trick. As for the fluorocarbon leader, I lean on 8-pound Sunline FC.
Final Thoughts and Tips on How to Fish a Neko Rig
While the Neko rig might just seem like an off brand wacky rig, it’s important to realize the differences in how and where you fish it. A wacky rig is great during the spawn when bass push incredibly shallow, but if you suffer from impatience like me, it loses its luster in the post-spawn when the bass pull back off the bank. The Neko rig has filled a much needed gap in my finesse tactics lineup and become a mainstay on my boat.
When you’re out fishing a Neko rig, remember to pay attention to your line as you won’t always feel a bite. Sometimes the bass will simply pick it up and start swimming towards you, making it tough to feel the bite. Your line zipping through the water is typically a good indication that it’s time to set the hook.
If you’ll be fishing a Neko rig for the first time this year, focus your efforts on the post-spawn around cover. You’ll be pleasantly surprised with how effective this rig is at fooling big bass during that time of year. A lighter Neko rig can also make for an incredibly effective follow up bait for topwater or big swimbaits this time of year. If you miss a strike, fire out a lightweight Neko rig in that general vicinity and hang on. You won’t be disappointed with the results.
The post Neko Rig: A Complete Guide on Rigging, Setups, and How to Fish It appeared first on Outdoor Life.
Source: https://www.outdoorlife.com/fishing/neko-rig/